A 1V/Oct Keyboard Controller
Pictures of the endevour

Background
I used to own a Korg DW8000, a really clever mixed analog/digital synthesizer. It taught me a lot about how you can use electronics to make music, espeically how you use different filters and envelope generators to make different sounds. It was pretty versatile, but soon I wanted something that would allow me to create any chain of filters and modulation sources in any combination.
This is of course the main feature of a modular synthesizer. So over the years I've gradually gotten the idea in my head that I would build one.
There is sort of a chicken-and-egg problem however: what do you build first? Something to make sound or something to control the thing to make sound? I made a few simple "noise makers" that weren't very musically useful if only because I had no way of controlling them to create music.
Description
Enter the keyboard controller. While it looks like a normal piano keyboard, it actually doesn't make any sound. Its sole purpose is to translate your key presses into control voltages that some other module turns into sound. (There are circuits that translate MIDI signals into control voltages, but I had no MIDI equipment at the time either.)
I looked around and found many keyboard controller circuits, but the one that caught my eye was the "Single Buss 1V/Octave Keyboard Controller" from musicfromouterspace.com. It is a neat little circuit with more applications that just keyboard controllers.
I ordered a PCB from them and started planning my keyboard.
Parts
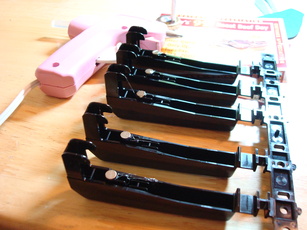
The first thing I needed were keys for my keyboard. I went to Goodwill and found an old Casio that had full sized keys and was very cheap.
I paid $10.
It was full of dead roaches.
I cleaned it for days.
I trashed the electronics, not because they didn't work, but because they were disgusting. I saved only the keyboard tray and the keys.
I got some reed switches from The Electronic Goldmine for a good price. These were already mounted in little plastic holders that later made it very easy to mount them.
I bought cheap magnets from K&J Magnetics. I didn't know the strength or size of magnet I needed to actuate the reed switches, so I decided to buy very thin magnets so that I could stack them to create different strengths and dimensions. This ended up being a very good idea.
I bought all the electronics I needed from an excellent local store. Music From Outer Space recommends 1% rsistors.
I also ended up buying adhesive-backed felt from Walmart.
Construction
I hot glued the reed switches in the position of the original switches. The plastic casing for the reed switches allowed me to line them up easily.
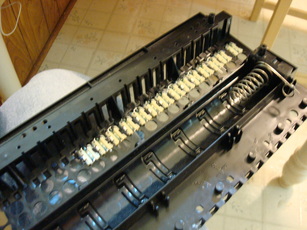
The keys went back together with no problems. I hot glued magnets to the bottom of the keys such that when the keys were pressed, the magnets would be near the switches. I found that due to mechanical and magnetic tolerances, I need to stack two magnets on some keys.
This left me with a partially working keyboard however. The original switches had their own detents which supported the keys in their resting (upwards) position. With those gone, the keys "floated". They were not the same height, and the force and distance to activate the reedswitches varied considerably.
The solution was two-fold. First, I installed some scrap cloth under the base of the keys to provide a soft shim. This raised the keys upwards more, but not too far.

Secondly, I installed a second row of magnets at the base of the keys and on the keyboard tray. They were aligned so they repelled each other, forcing the keys up. This gave the keys a very nice action. The force to push the key down increases as you push further. This isn't like a piano, where there is a sort of "snap" when the hammer swings to hit the string. It is also not like a cheap keyboard with very little tactile feedback.

On some of the keys, I had to stack the magnets to acheive more feedback, to even out the overall feel of the keyboard.
The final step was to install felt on the underside of the keyboard tray such that the mechanical stops on each key were stopped at the same place. The adhesive felt worked excellently for this application.
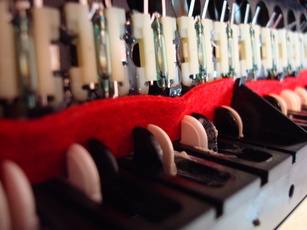
I cut strips of felt and stuck them to where they needed to go, under the upswing stops of the keys. I then cut little notches in the felt to accomidate the various plastic posts sticking out from the bottom of the keyboard tray.

Electrical
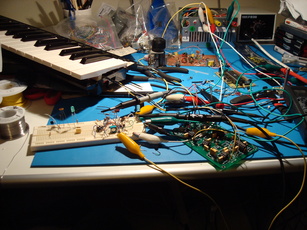
The reed switches already had little leads coming out of their plastic casings, so it was easy to solder the resistor chain for the controller. I used stranded hookup wire to bring the signals over to the circuit board.

I fashioned a little connector so that I can use other controllers with the circuit board if I want to.

The circuit board from Music From Outer Space was excellent in quality. I followed his instructions and had no problems. It tuned up with no problems using my oscilloscope and voltmeter.

I have seen no problems with false triggers on the oscilloscope. I highly recommend this circuit board.
Conclusion
Now that I have a controller, I need an oscillator to control with it! It is somewhat anticlimatic to finish this project because there isn't much to show for it in the way of music making.
I rigged up a very simplistic VCO with very poor tracking. I could control the frequency of the sound using the controller, but not in a musical way. The simple VCO didn't have 1V/Octave tracking, so the notes on the keyboard didn't match the "notes" being played.
But now I have an excuse for my first real modular synth module!